Paint/varnish removal can be daunting if your inexperienced, but its an essential part of the process when restoring timber furniture. Aged furniture is often thrown out and replaced without a second thought, but this is wasteful, costly, and unsustainable. At Restorers’ Choice, we think its important to protect and preserve, not replace; that’s why we have prepared this guide with 4 easy to follow steps on how to correctly use paint stripper, without damaging the furniture or yourself.
1/ Preparation
A clean and tidy workspace is essential when using paint stripper. Its easy to become overwhelmed if you have not prepared the area properly. Ideally, paint stripping should be done outside, but not in the sun, rain, or wind. A well-ventilated room such as workshop or garage will also work, but make sure surrounding valuables are covered from potential splash before starting.
Gather the materials and tools you will need. For most jobs you will need an application brush, a bucket/container, a paint scraper, and coarse steel wool. For safety, easy clean up and protection of areas you won’t be stripping, its always good to have a drop sheet, masking tape, safety googles, gloves and a near by water source like a sink or hose to wash your hands, face, and eyes, just in case.
Remove all hardware and use masking tape to cover areas you don’t want to strip. This includes cabinet hinges, handles, glass, labels, and fabrics. Its much easier to strip furniture such as cabinets and chest of drawers with the doors and drawers separate.
2/ Application
Working in sections is a great way to avoid mess and stay in control. It’s recommended to start on the area that will be easiest, since practice makes perfect you want a bit of experience before tackling the tricky bits such as corners and carvings.
Pour some paint stripper into a container or bucket for easy access, start off with a small amount to avoid wastage, more can be added if necessary.
Apply a generous layer of paint stripper (roughly 3mm thick) using a natural fibre application brush. It important that the coverage is as even as possible because the paint stripper will dry out if applied too thin. If you notice thin spots, you can simply apply more stripper to that area. Wood strip has a thick gel like consistency with a strong hold so there is very little risk of it ‘running’ off the sides and making a mess, so don’t be afraid to build a thick layer.

Before applying Wood Strip

30 seconds after application

3 minutes after application
3/ Removal
Within seconds you can see the paint stripper work its magic! In the example below, it only took about 30 seconds for the paint to start separating from the timber. After about 3 minutes the paint had fully separated and could be easily scrapped off with a paint scrapper. Its important to remember that results may vary depending on the thickness, application and type of paint/varnish used, but this is a common result. you may need to wait longer for stubborn finishes, the longer you wait, the better.
Sometimes the paint stripper is only able to penetrate a few layers of paint/varnish at a time, if this is the case, scrape off the dissolved paint layer and reapply in the exact same way to the remaining paint. Sometimes this will have to be repeated a few times before you are down to the wood.

Scraping back the first layer

Reapplying Wood Strip to the second layer

Scraping back the second layer
4/ Finishing coat
Once you have removed all the paint/paint stripper using the paint scraper, you will need to apply a finishing coat. The finishing coat is used to ensure the surface is properly cleaned of all paint and varnish, leaving you with a surface that can be sanded, stained, oiled, or painted and look magnificent with no imperfections.
Apply a much thinner layer of paint stripper (only about 1mm think) to the area. Using the coarse steel wool, firmly scrub the surface, wiping the paint stripper back and forth deep into the grain of the timber, this will completely clean any grooves and grain of all remaining paint and varnish and remove any stubborn paint that wasn’t removed with the first strip. DON’T use any water, the paint stripper alone is enough to do the job, keep scrubbing and replace the steel wool with a new piece once it is soiled with paint stripper. This process will completely clean the surface leaving the natural timber fully exposed.
Mineral Turpentine or Methylated Spirits can be used to clean the surface of any remaining residue. Simply wet a rag or cotton cloth in the turpentine or spirits and wipe the surface clean, using a clean rag or towel to dry it.

After removing the final layer of paint

After scrubbing with steel wool

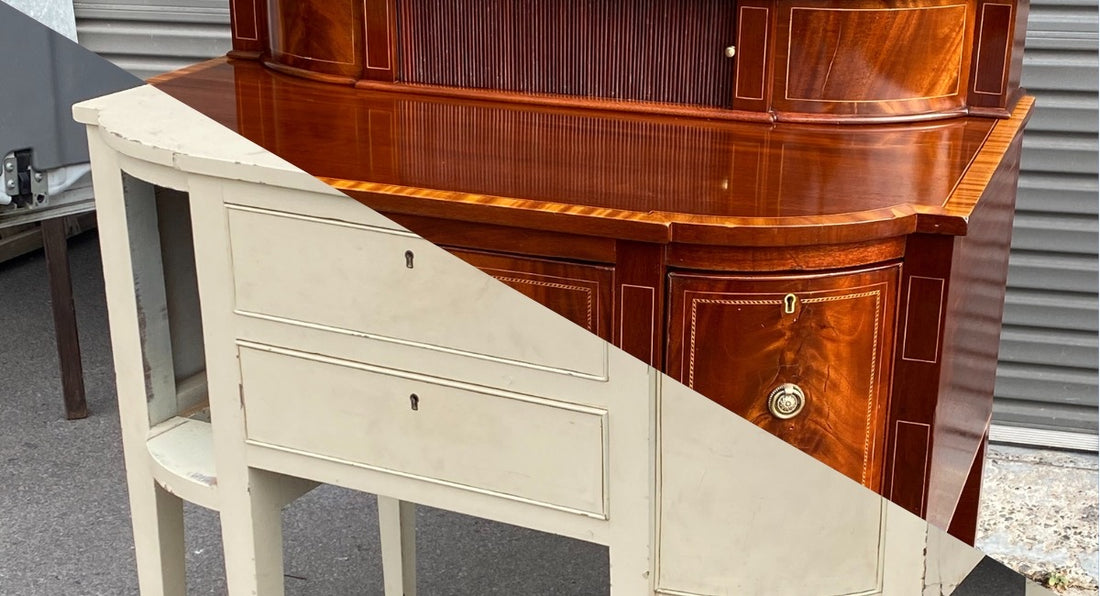
Final results
If all steps are followed correctly, then you will be left with an unrecognisable piece of furniture, ready for a new coat of stain, oil, lacquer, or French polish to bring it back to life. At Restorers’ Choice, we believe furniture should be rejuvenated, restored, and protected, not replaced. We pride ourselves in preserving what’s important and we are always happy to answer any questions you may have about restoration or the products that we provide.